C# Generics and Unity

Using Generics.png

Generics are something that can sound scary, look scary, but you are probably already using them - even if your don’t know it.

So let’s talk about them. Let’s try to make them a little less scary and hopefully add another tool to your programmer toolbox.

If you’ve used Unity for any amount of time you’ve likely used the Get Component function. I know when I first saw this I simply accepted the fact that this function required some extra info inside of angle brackets. I didn’t think much about it.

Later I learned to use lists that had a similar requirement. I didn’t question why the type that was being stored in the list needed to be added so differently compared to when creating other objects. It just worked and I went with it.

It turns out that those objects are taking in what’s called a generic argument - that’s what’s inside the angle brackets. This argument is a type and it helps the object know what to do. In terms of the GetComponent function, it tells it which type to look for and with the list, it tells the list what type of thing will be stored inside that list.

Generics are just placeholder types that can be any type or they can also be constrained in various ways. It turns out this is pretty useful.

Why?

Ok. Great. But why would you want to use generics?

Well essentially, they allow us to create code that is more general (even generic) so that it can be used and reused. Generics can help prevent the need for duplicate code - which for me is always a good thing. The less code I have to write, the less code I have to debug, and the faster my project gets finished.

We can see this with the GetComponent function in that it works for ANY and ALL types of monobehaviours. This one function can be used to find all built-in types or types created by a programmer. It would be a real pain if with each new monobehaviour you had to write a custom GetComponent function!

The same is true with lists. They can hold ANY type of object and when you create a new type you don’t have to create a new version of the list class to contain it.

So yeah. Generics can reduce how much code needs to get written and that’s why we use them!

Ok. So Give Me An Example!

Scene Setup.png

I’ve created a simple scene of various shapes. I’ve created some code that will generate a grid of random shapes… but that’s not the important part.

The important part is that I have four classes defined. The first is a basic shape class that the cube, sphere, and capsule class inherit from. Then each of the prefab shapes has the correspondingly named class attached to them.

Shape Class.png
Not much going on here!

Not much going on here!

All of these classes are empty and are primarily used to add a type to the prefab. I do this fairly often in my projects as it’s a way to effectively create tagged objects without using the weakly typed tag system built into Unity. I find that it’s an easy and convenient way to get a handle on scene objects in code.

But more to the point! It allows us to leverage generics in C# and Unity.

When the shape objects are instantiated they are all added to a list that holds the type “shape" as a way of keeping track of what’s currently in the scene. Instead of just shapes sitting in a grid, these could be objects in a player’s inventory or maybe a bunch of NPCs that populate a given scene or whatever.

You can imagine 2 more exactly like this… Just with “Capsule” or “Sphere” instead of “Cube”

You can imagine 2 more exactly like this… Just with “Capsule” or “Sphere” instead of “Cube”

So let’s imagine you need to find all the cubes in the scene. That’s not too hard you could write a function like the one to the right. We can simply iterate through the list of scene objects and add all the cubes to a new list and then return that list of cubes.

And then if you need to find all the spheres. We can just copy the find cube function and change the type of list we are returning and the type we are trying to match. Done!

And again we can do the same thing with the capsules.

But now we have three functions that do almost the exact same thing and this should be a red flag! We have three chunks of code doing nearly the exact same thing. There must be a better way?

Turns out there is!

Create A Generic Function

The only difference between the three functions we’ve created is the type! The type in the list and the type that we are trying to match when we iterate through the list.

Multiple Generic Arguments.png

We are doing the same steps for every type. Which is the exact problem that generics solve!

Find Al Shapes of Type.png

So let’s make a generic function that will work for any type of shape. We do this by adding a generic argument to the function in the form of an identifier between angle brackets after the function name and before any input parameters.

Traditionally the capital letter T has been used for the generic argument, but you can use anything. It’s even possible to add additional generic arguments. They just need to be separated by commas. Some sources will suggest using T, U, and V which will work but doesn’t necessarily allow for easily readable code. Instead, another convention is to start with a capital T and follow it with a descriptor. For example TValue or TKey. Whatever makes sense for your use case.

This generic argument is the type of thing we are using in our function. Which for our case is also the type stored in the list and is the type we are trying to match. So we can simply replace the particular types with the generic type of T.

Do note that we still have the type of “shape” in our function. This is because the list with all the scene objects is storing types of shape so in this case, that type is not generic.

In my example project, I have UI buttons wired up to call this generic function so that cubes, spheres, and capsules can be highlighted in the scene. Each button calls the same function, but with a different generic argument.

Shape Select Buttons.png

The result? We have less code, the same functionality AND the ability to find new shapes if new types are added to our project without having to create significant code for each type of shape.

Generics Constraints

You may have noticed that I snuck in a little extra unexplained code at the top of our generic function. This extra bit is a constraint. By using the keyword “where” we are telling the compiler that there are some limits to the types that T can be. In this case, we are constraining T to be the type Shape or a type that inherits from Shape. We need to do this otherwise the casting of the object to type T would throw an error as the compiler doesn’t know if the types can be converted.

Destory Objects of Type.png

Constraints can be very wide or very narrow. In my experience, constraints to a parent class, monobehaviour, or component are very common and useful.

Without a constraint, the compiler assumes the type is object which while general there are limits to what can be done with a base object.

For example, maybe you need to destroy objects of a given type throughout your scene. This isn’t too hard to do, but a generic function does this really well.

The function “find all objects of type” returns a Unity Engine Object which is too general. If we constrain T to be a component or a monobehaviour we can then get access to the attached gameObject and destroy it.

(Link) You can find more about constraints here.

Another Example

Shape of Type Under Mouse.png

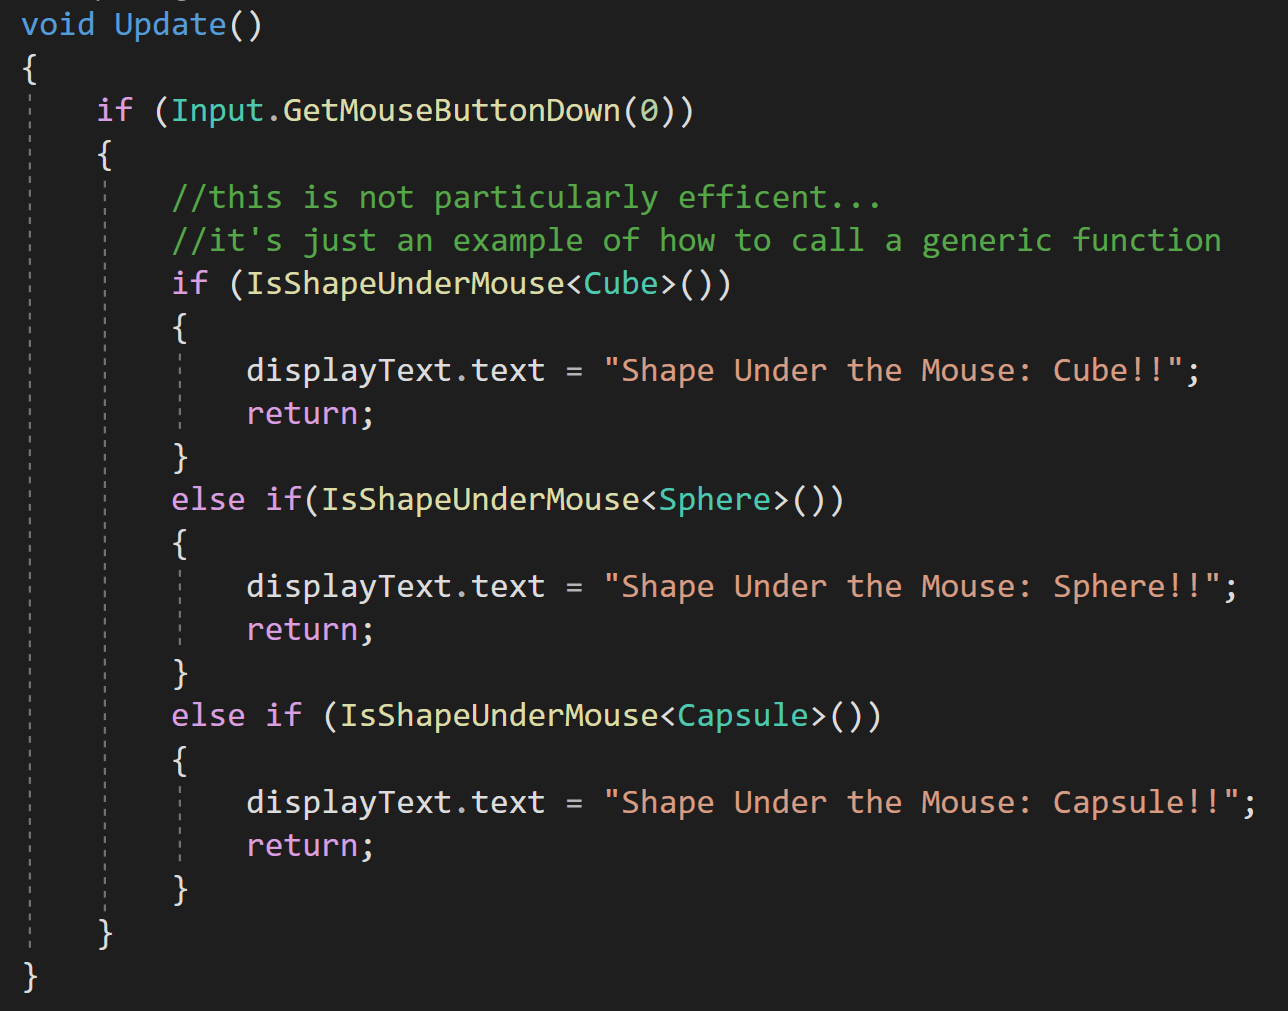
In my personal game project, I often need to check and see if the player clicks on a particular type of object. There are certainly many ways to do this, but for my project, I often just need a true or false value returned if the cursor is hovering over a particular object type.

Check for Object Under Mouse.png

This is again a perfect use for a generic function. A raycast from the camera to the mouse can return a raycast hit. If that hit isn’t null we can then check to see if the object has a component. Rather than check for a particular component, we can check for a generic type. Note once again we need a constraint and that the generic type needs to be constrained to be a component.

Then to use this function we simply call it like any other function but tell it what type to look for by giving it a generic argument. Not too complex and definitely re-usable.

Static Helper Class

Additionally, many generic functions can also operate as static functions. So to maximize their usefulness, I often place my generic functions in a static class so that they can easily be used throughout the project. This often means even less code duplication!

Generic Classes

Generic Class Example.png

So far we’ve looked at generic functions, which I think are by far the most common and most likely use of generics. But we can also make generic classes and even generic interfaces. These operate much the same way that a generic function does.

The image to the right shows a generic class with a single generic argument. It also has a variable of the type T and a function that has an input parameter and a return value of type T. Notice that the type T is defined when the class is created and not with each function. The functions make use of the generic type but do not require a generic argument themselves!

Do note that this class is a monobehaviour and as is Unity will not be able to attach this to a gameObject since the type T is not defined.

However, if an additional class is created that inherits from this generic class and defines the type T then this new additional monobehaviour can be attached to a gameObject and used as a normal monobehaviour.

The uses for generic classes and interfaces highly depend on the project and are not super common. Frankly, it’s difficult to come up with good examples that are reasonably universal.

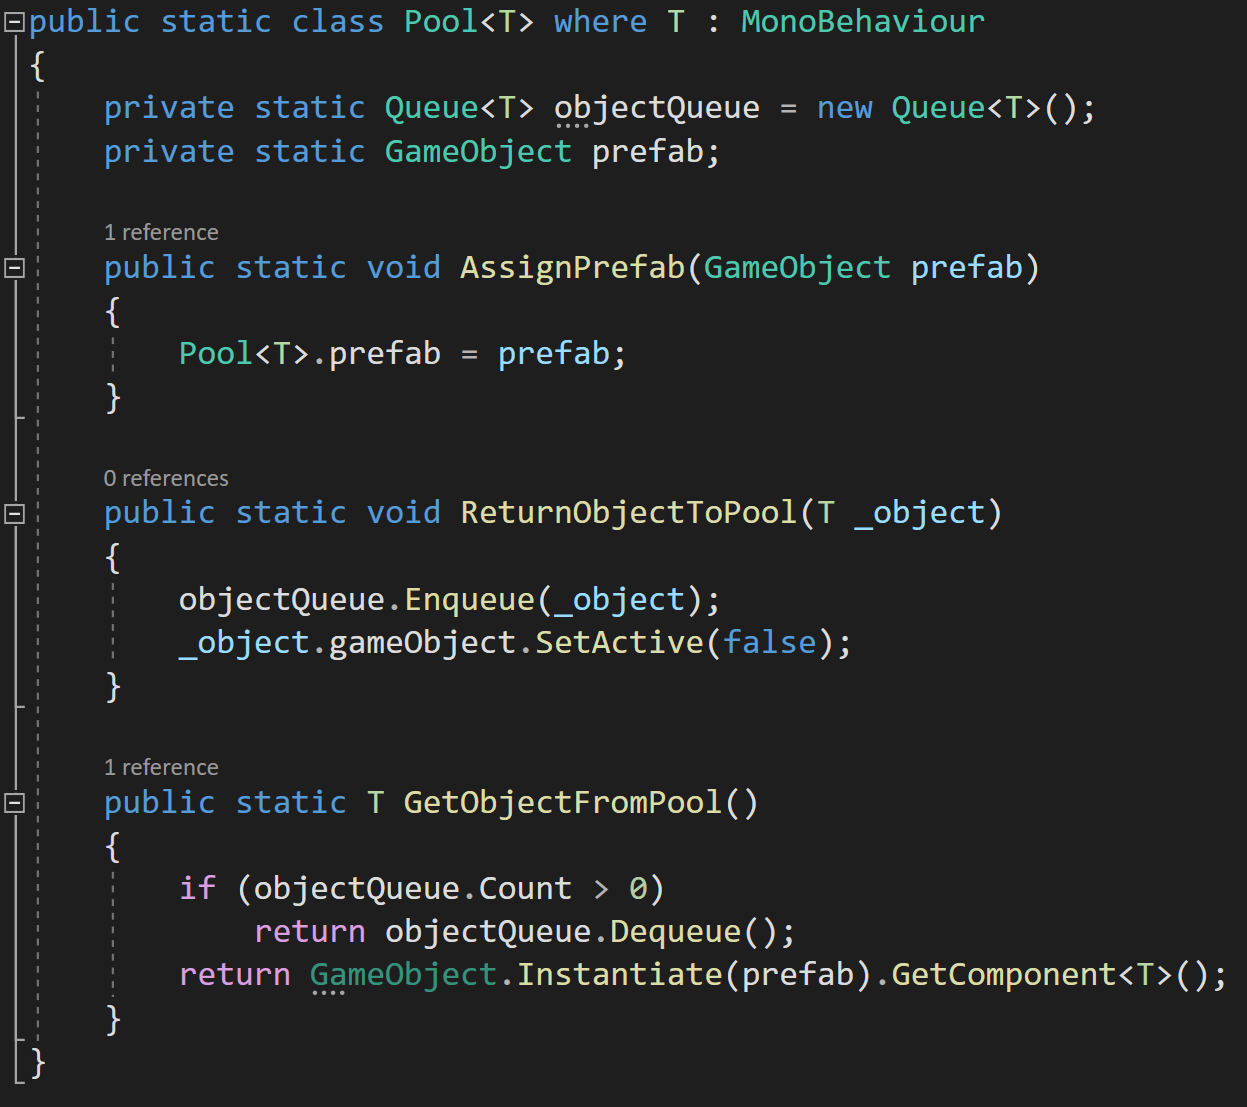
Object Pool.png

An imperfect example of a generic class might be an object pooling solution where there is a separate pool per type. Inside the pool, there is a queue of type T, a prefab that will get instantiated if there are no objects in the queue plus functions to return objects to the pool as well as get objects from the pool.

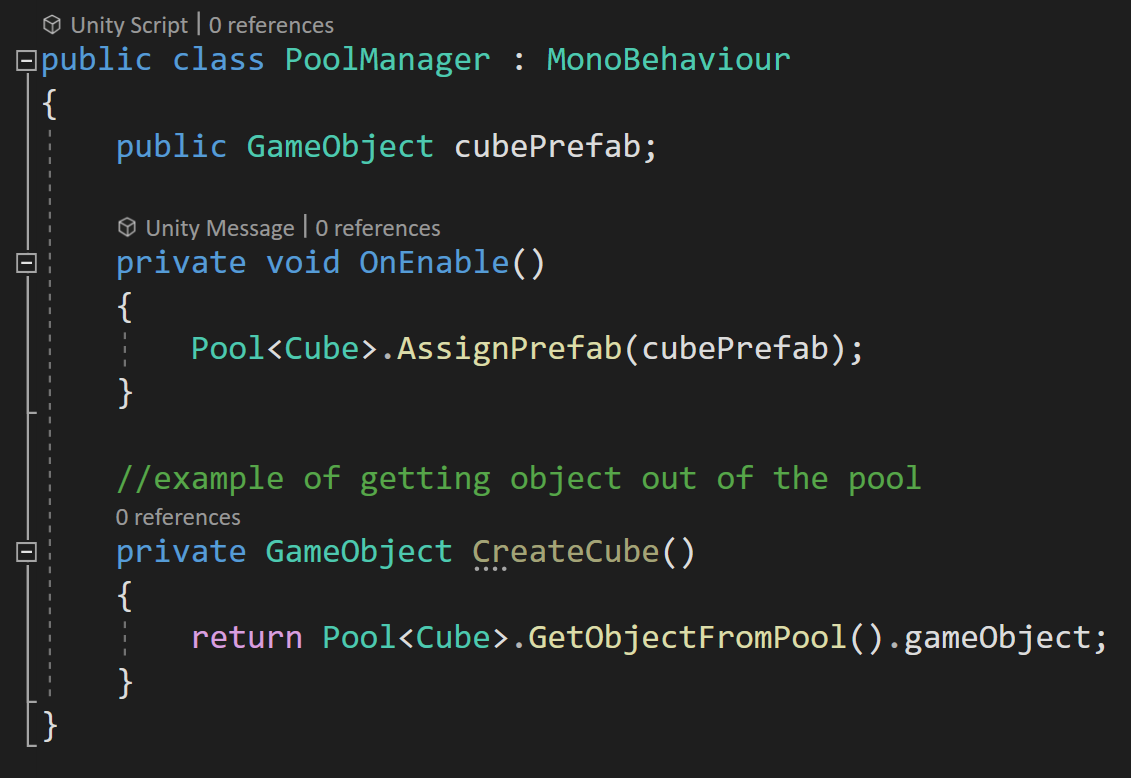
The clumsy part here comes from the assigning of the prefab which must be done manually, but this isn’t too high of a price to pay as each pool can be set up in an OnEnable function on some sort of Pool Manager type of object.

Pool Manager.png

This class is static and is per type which makes it easy to get an instance of a given prefab. In this case, we are equating the type with a prefab which could cause problems or confusion, so just something to be aware of.

Generics vs. Inheritance

It turns out that a lot of what can be done with generics can also be done with inheritance and often a bunch of casting. And it might turn out that generics are not the best solution and using inheritance and casting is a better or simpler solution.

But in general, using generics tends to require less casting, tends to be more type-safe, and in some cases (that you are unlikely to see in Unity) can actually perform better.

(Link) To quote a post from Stack Overflow:

You should use generics when you want only the same functionality applied to various types (Add, Remove, Count) and it will be implemented the same way. Inheritance is when you need the same functionality (GetResponse) but want it to be implemented different ways.

Steam Workshop with Unity and Facepunch Steamworks

Adding workshop functionality to a game is something I’ve wanted to learn to do for a long while. I dreamt of doing it with my first game and every project since then. There seemed like there were so many sticking points and potential problems. As I see it there are two main problems.

  1. Not only do you have to create the tools to make that content you have to create the framework to handle that content… While that may sound easy, I don’t think it is. At least for most games.

  2. The documentation on how to implement workshop functionality is scarce. Really scarce. At least from my searches. I’ve found almost NOTHING.

screenshot ac17b53e-8d59-45a3-8e54-410b276034a7.png

With Where’s My Lunch it was easy to figure out the type of content. Levels!

I already had a sandbox level built into the game, so turning that into a level editor really shouldn’t be too much of a stretch. In my earlier post, I explained how I’m using “Easy Save” to save all the data from levels and store it as an external file. It’s surprisingly simple… even easy. ;)

With the type of content and a simple (singular) external file the first problem is largely solved.

The second problem that of the lack of documentation… Was seemly solved by using Facepunch Steamworks. Well, sort of.

Facepunch, provides some code snippets of how to upload and update a workshop item. It looks pretty simple. And it is, sort of. As always the problems lie in the details. And those details can often depend on your projects needs and structure.

Disclaimer & Goals

The main goal of this post is to give an example of how I implemented the Steam Workshop and not to give a step by step process for you to follow exactly - I actually don’t think it’s even possible since every game is so different.

I’m going to try to talk about big ideas and point out the problems I had along the way. I’ll look at how to upload, download and update your workshop items.

These are things that any and all implementation of the Steam Workshop will need to do - at least I think so.

Now, I’m not going to look at how to handle the data and files that are uploading and downloading inside of your project as that’s almost 100% dependent on the type of files and how they’re being used in the individual project

I’m also sure there are some better ways to do what I’ve done. That’s just the way it is and I’m okay with that. If you know of a better or easier way, leave me a comment, I always love to learn something new!

One last thought. When it comes to topics like this… well… there is only so much hand holding that can be done. If you are just getting started with Unity and C#, to be honest, this probably isn’t something that you should be trying to do until you get more experience.

Setting Up the Backend

There’s a not that NEEDS to get set up in Steamworks, but there are a few things. And! They are not covered in the Facepunch Documentation.

Workshop.png
Enable UGC.png

First, we need to enable UGC file transfer, which is done with a single toggle.

Easy.

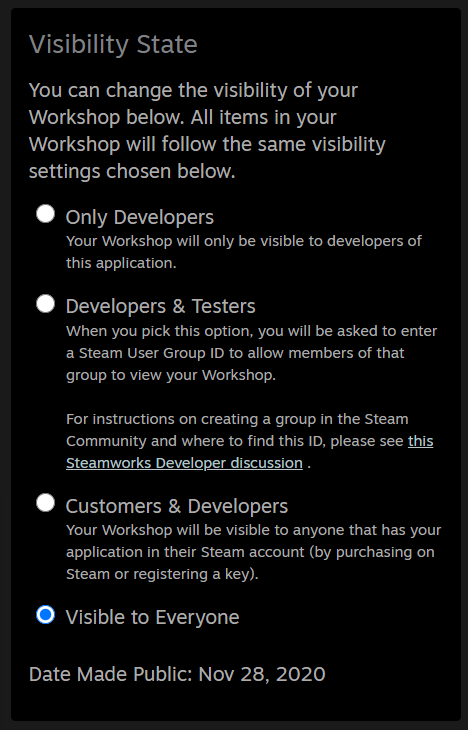
Workshop Visibility.png

Next, we need to set the visibility state. The default setting will be enough for you, the developer, to upload files, but if you want your audience to be able to test the workshop your going to need to do more work. For early testing I choose the second option, which requires a custom Steam group for your testers. Anyone in that group will automatically have access to the workshop. Which option you choose is, of course, up to you and your project’s needs.

THEN! There is one more important step.

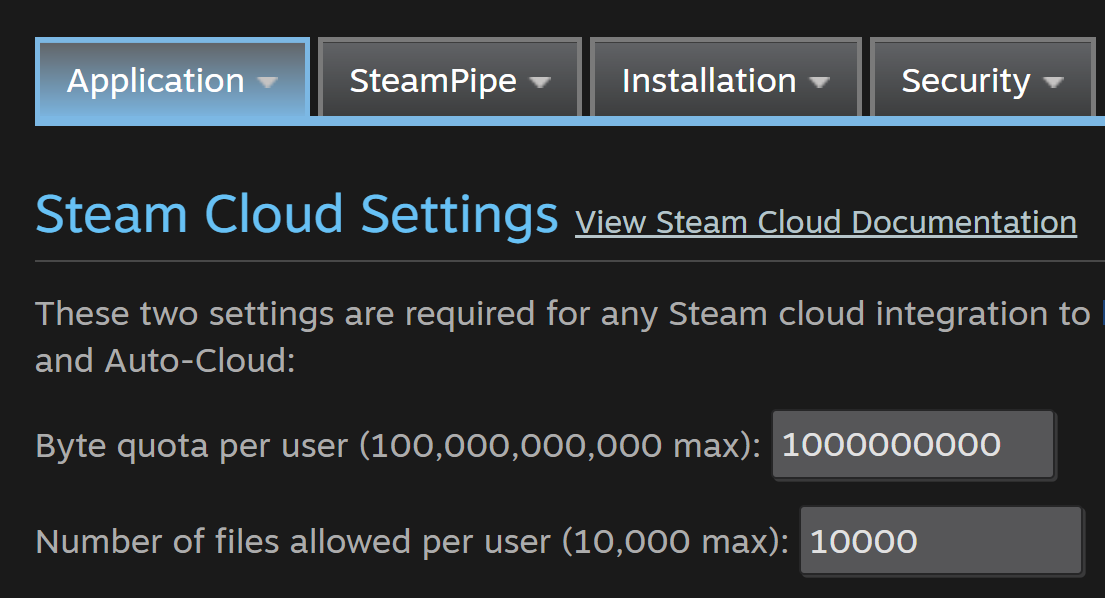
If you are uploading images or larger files you need to enable Steam Cloud and increase the byte quota and number of files per user. In the Steam Developer forums the Valve employees seemed to be in favor of raising the limits far high than expected - which I imagine is to avoid errors and player frustration. I have no idea why the default is so low.

If you don’t change these settings your uploads will fail and there will be no indication that this is the problem. I didn’t hit this snag originally while uploading small save files, but once I added preview images the uploads started failing.

SteamCloudSettings.png

And I spent hours! Hours! Trying to figure out the problem. So yeah. Go change those settings before you go too far.

There are of course other settings but these are the basics that are required.

Uploading!

This is an exciting step. And not a hard one… If it works.

Facepunch and of Steamwork gives almost no indication for the cause of problems if there are any. So yeah. Find some patience and be prepared to spend some time searching for solutions.

The example given by Facepunch is a pretty good start. It’s easy, but with minimal feedback there are a few pitfalls.

Below you can see the upload function that I’m using. I’ve minimized lines that are overly specific to my project.

Workshop Upload.png

To upload you will need a path to the folder containing all of the files and assets. For the file preview image you will need a path to the actual file that will be uploaded.

ProgressClass.png

After that the code snippet from Facepunch shows what you want you need to do. There are several parameters or options for the upload, that while not well documented are named well enough to figure out most of them. For my purposes I added a description, a few tags and set the visibility to public. If you don’t set the visibility to public, the upload will succeed, but the it will be set to private by default.

You may also notice that I’ve created a new instance of the Progress Class. For the most part my version was taken straight from Facepunch, with the addition of a few clumsy bits that will provide some visual feedback to the user while their files are uploading.

The uploading process is asynchronous, so after the upload process has been attempted I send a message to the console based on the results. The results, don’t tell you much, beyond whether the upload was a success or not.

I really wish there were more clues to why an upload may have failed…

If the upload did fail, I display a message to the user and then invoke an event to make sure all the systems that might care about a failed upload know it happened.

It takes a few minutes, but assuming the upload is successful, your workshop item will appear on the game’s workshop page.

Pretty sweet and not too hard.

Downloading

The idea behind downloading is to do a search, then based on the results of that search individual workshop items can be queried or downloaded.

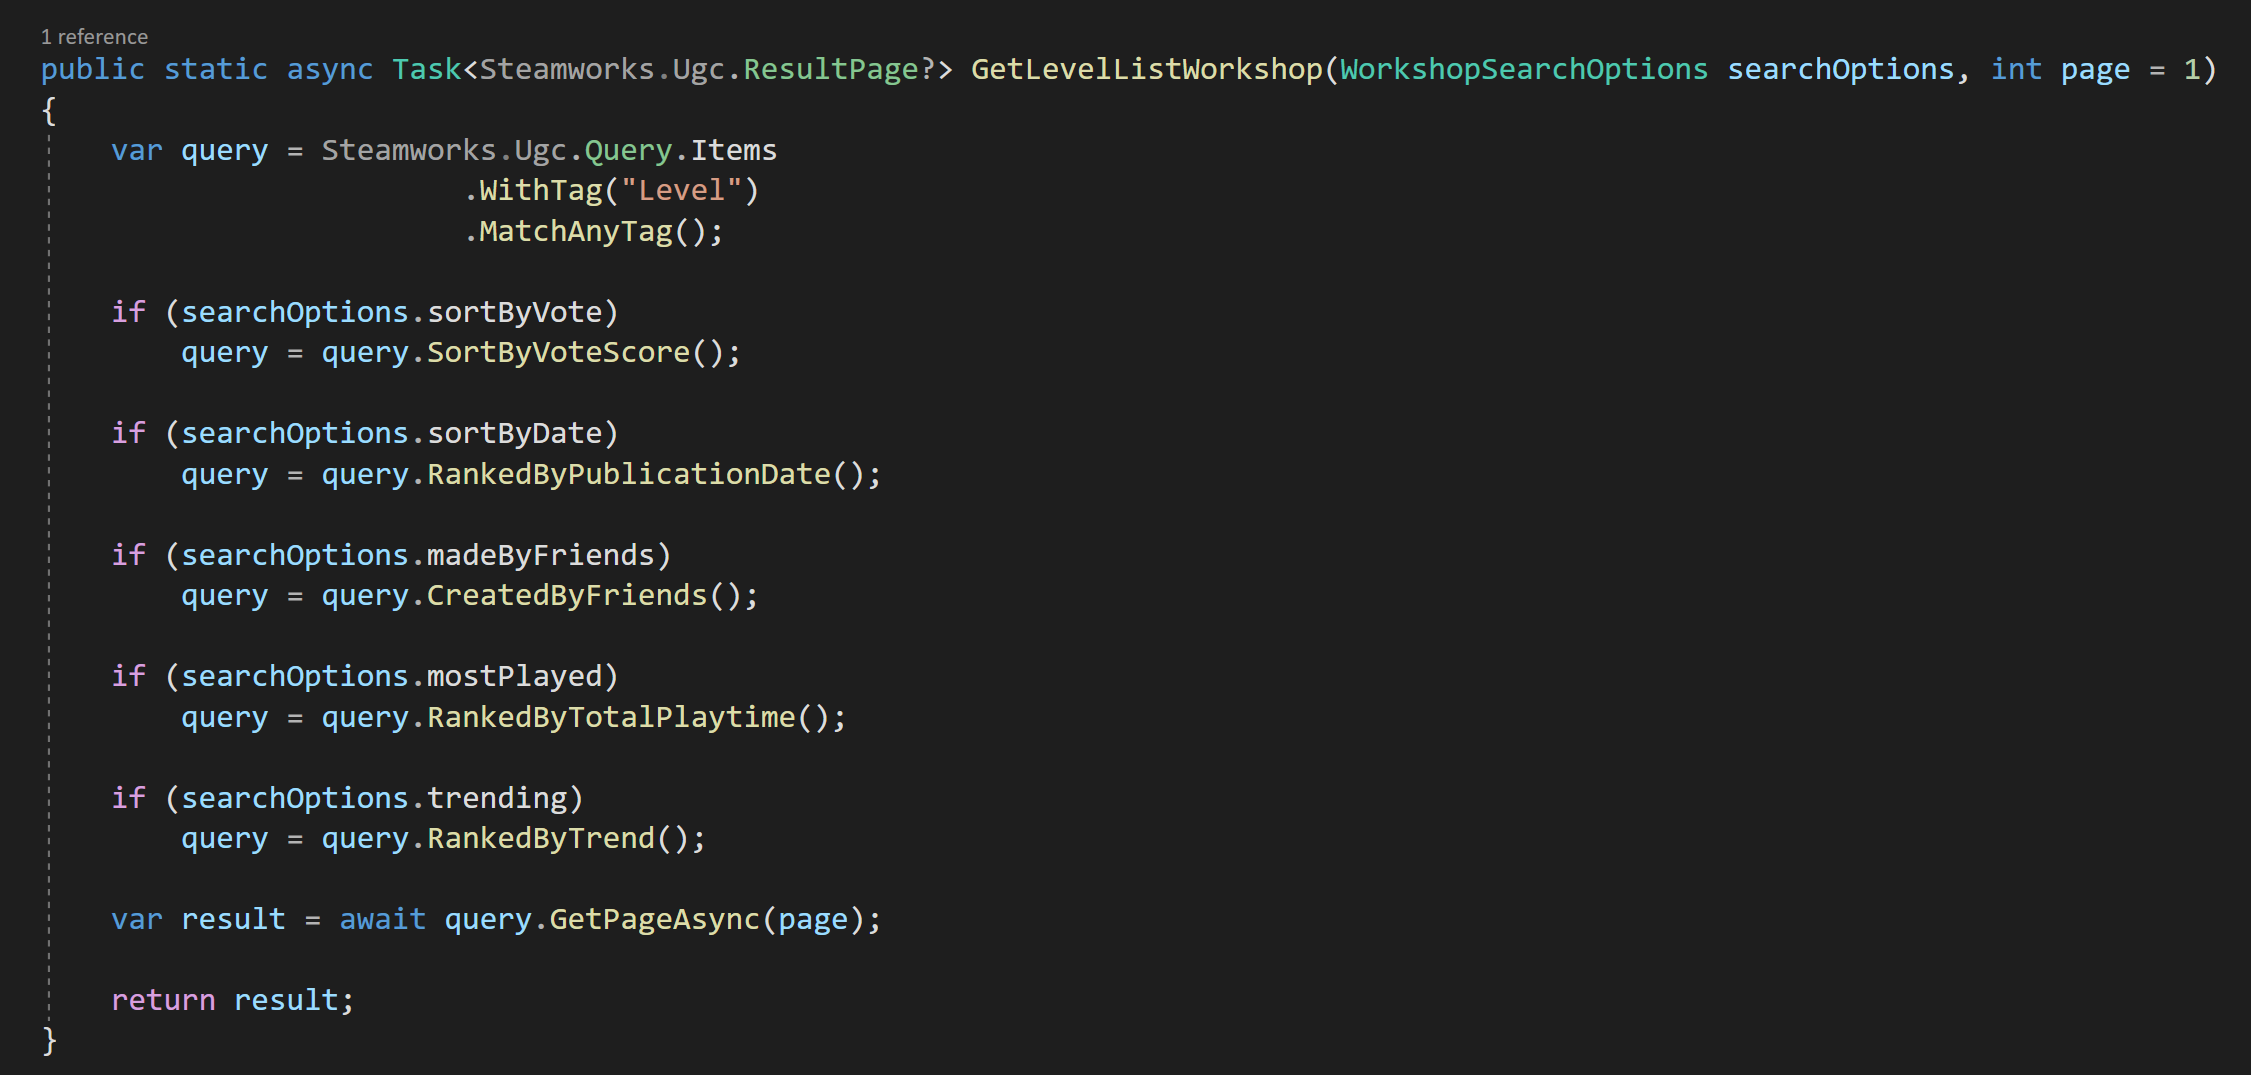
Once again, the Facepunch documentation is pretty good and the process of doing a search is fairly straightforward. In my code, I search by tag and then have other optional searches that can be added by the player.

The search also requires a page number. By default I get the first page, but it’s likely you will want additional pages and you will need to handle this in your implementation. In mine I repeat the search and increment the page number when the player scrolls to the bottom of the list.

Get Workshop Level List.png
Workshop Search Options.png

I choose to wrap the search options in a class for convenienceand to reduce the number of input parameters in the class. While I included many of the possible search parameters, I didn’t include all of them but this custom class will allow me to easily add new parameters without breaking the search functions.

Just like the upload process the search process is asynchronousand the results will come back in a short period of time so it must be done in an “async” function and wrapped in a try/catch.

It’s possible that the results are empty and Facepunch provides a “hasValues” property that can be used to ensure or check that the search was successful.

Do Search Function.png
Iterate Through Search Results.png

Then the results, if there are any, can be looped through with a foreach loop like so.

Displaying Workshop Item info

Displaying Workshop Item info

How exactly you handle those results is of course up to you. Steamworks.Ugc.Item type gives you access to the title, description, votes by the community, a url to the preview image and a whole lot more. Accessing these properties is straight forward, but once again the handling of those values is very much dependent on your project.

To the right (ish) you can see my user interface for each workshop level. The buttons on the bottom right are contextual and change visibility depending on the status of the item. There are also download and delete buttons that are currently hidden and will appear when they can be used.

The actual downloading of an item is quite simple and easy. Items are downloaded by Steam ID which is readily accessible from the workshop item. The files are downloaded to folder in a Steam library. There location can be found with the “directory” property of the Steamworks UGC Item.

Download Workshop Item .png

Do note that you are not downloading a Steamworks UGC Item type! You are downloading the same files you uploaded.

This caused some struggles on my end. It was easy for me to think I no longer needed reference to the Steamworks UGC Item and just work with the downloaded files. Once you lose reference to the item there is no (easy) way to find it again from the downloaded files. By losing reference to the item you lose access to lots of metadata that you’re probably going to want.

So tracking or keeping reference to an item is important and many of my functions pass references to items not the saved files. It’s okay if that doesn’t make sense… I think it will once you start implementing your own solution.

To Subscribe or Not To Subscribe?

So maybe I’ll show my ignorance with the Steam Workshop, but I was under the impression that I didn’t need or want to subscribe to each and every level that a user might want to try out. In the API downloading and subscribing are different actions. I couldn’t find anything that said you should do both…

So here’s me saying I think you should do both!

It keeps things simple and is one less “thing” that needs to get checked. There was some snag I hit… to be honest I can’t remember what exactly it was now, but it was going to take a lot of work engineer around not subscribing. So yeah. Just do it. It’s easy and personally I don’t see a downside for the player.

Updating Workshop Items

The last big hurdle with the workshop was updating items... Once again, the actual updating is pretty straight forward and is very similar to the uploading. The biggest difference here is that rather than create a new community file we are passing in the Steam ID of the item which allows Steamworks to update the files.

Update Workshop Item.png

The one big snag I hit was that the update will fail IF the file has not changed. There’s no indication that this is the problem, the files just won’t upload or update. Which makes sense but leads me to the next issue…

In WML players can locally save a level and don’t have to upload it. This makes sense to me on a lot of levels and I’d venture a guess it’s how most games do it too. But this means that there could be a local version and the downloaded workshop version in different folders… On top of that there’s no easy way to compare those files or know if one exists and the other doesn’t. It seemed to get messy in a hurry.

So if a player makes changes to a level, which version should it save to?

Hmm. Maybe this is obvious, but I definitely needed to think about it for a good while.

I came to the conclusion that changes should always be made to the local versions. And those local versions would need to get pushed to the workshop. This means if a user downloads someone else’s item then before they can edit it a local version is saved.

Check Ownership.png

It’s also unclear to me whether Steam itself checks ownership, so I created an internal check of the item ownership before updating. If the original item is not owned by the current user the files are uploaded to the workshop as a new item. If the original is owned by the player the files update. This leaves out the edge case of the owner wanting to upload the files as a new item, but I’m okay with that.

Deleting Items

Delete Workshop Item.png

It’s quite possible that users will want to delete an item that they’ve uploaded - this is especially true if you are doing some testing with the workshop. And it’s once again very easy. One function call with the Steam ID and it’ll get removed.

The process does take some time and could cause some issues if the user refreshes the search as the item seems to be partially still there for up to a minute or two. For WML, I have the imperfect solution of turning off the UI object when a level is deleted. This gives the user some indication that the deletion is happening, but if they refresh the search I don’t have a system in place (yet) to not show the partial and confusing results.

Conclusion

In the big scheme of things that’s really not that complicated. The amount of code needed to upload, download and update files is actually quite small. The bulk of my code is handling the UI or controlling the input and output of these functions - I’m happy to share those bits, but they are highly dependenton the game and I’m not sure they are particularly useful. But I could be wrong.